Advanced Demo - Fully serverless app
[Prompt O’matic]
Building a simple serverless application using S3, API Gateway, Lambda, Step Functions, SNS & SES
Stages to Prompt O’Matic
-
![]()
Stage 1
Configure Simple Email service
-
![]()
Stage 2
Add a email lambda function to use SES to send emails for the serverless application
-
![]()
Stage 3
Implement and configure the state machine, the core of the application
-
![]()
Stage 4
Implement the API Gateway, API and supporting lambda function
-
![]()
Stage 5
Implement the static frontend application and test functionality
-
![]()
Result
How it all looks - http://promptomaticmarco.s3-website-us-east-1.amazonaws.com/
-
![]()
More exlusive than Flappy Bird 🐦
How’s it work?



Stage 1 - Configure Simple Email Service

The Prompt O’Matic application is going to send reminder messages via SMS and Email. It will use the simple email service or SES. In production, it could be configured to allow sending from the application email, to any app users.
SES starts off in sandbox mode, which means I’m only able to notify verified addresses (to avoid mass spamming). I first verified the sender address and the receiver address. At this point, I have whitelisted 2 email addresses for use with SES.
the Prompt O’Matic sending address
the Prompt O’Matic customer address
Also having configured an SMS number within SNS. For certain countries such as the USA, it would be necessary to arrange an origination number in Amazon Pinpoint.
Stage 2 - Email Lambda Function > SES

Here, I created an IAM role with the email_reminder_lambda function to interact with the rest of the stack. I used CloudFormation to automate the provision of SES, SNS & Logging permissions.
import boto3, os, json
FROM_EMAIL_ADDRESS = 'marcoverse@gmail.com'  ses = boto3.client('ses') def lambda_handler(event, context):     # Print event data to logs ..      print("Received event: " + json.dumps(event))     # Publish message directly to email, provided by EmailOnly or EmailPar TASK     ses.send_email( Source=FROM_EMAIL_ADDRESS,         Destination={ 'ToAddresses': [ event['Input']['email'] ] },          Message={ 'Subject': {'Data': 'Start studying you absolute deviants!'},             'Body': {'Text': {'Data': event['Input']['message']}}         }     )    return 'Success!'.
This stage configures the lambda function which will be used eventually to send emails on behalf of the serverless application.
Stage 3 - Configure State Machine Compute

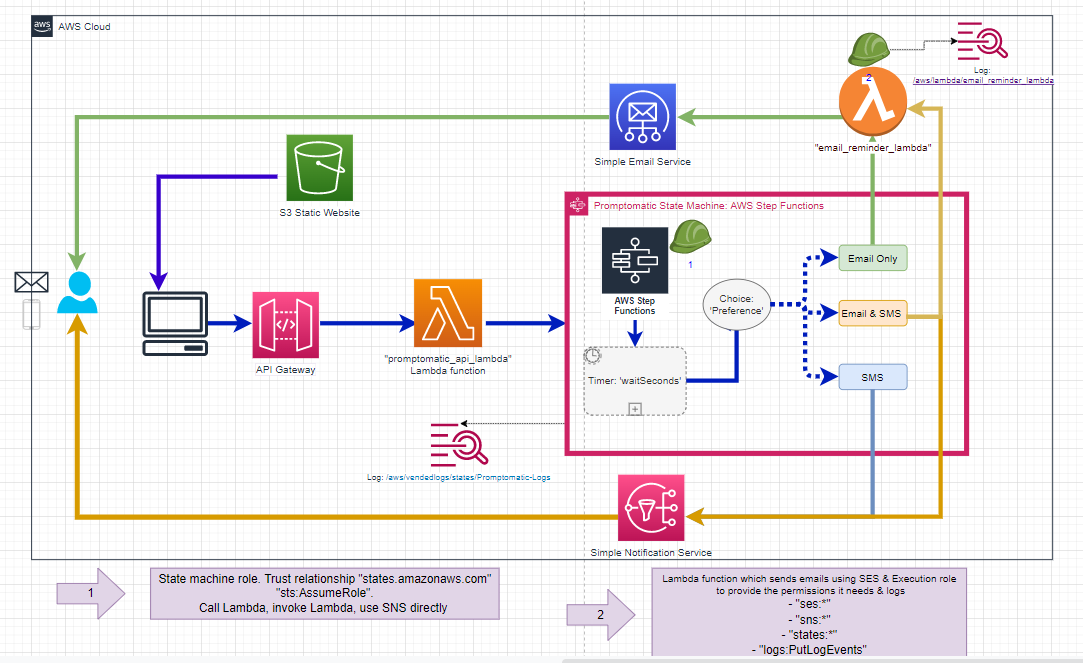
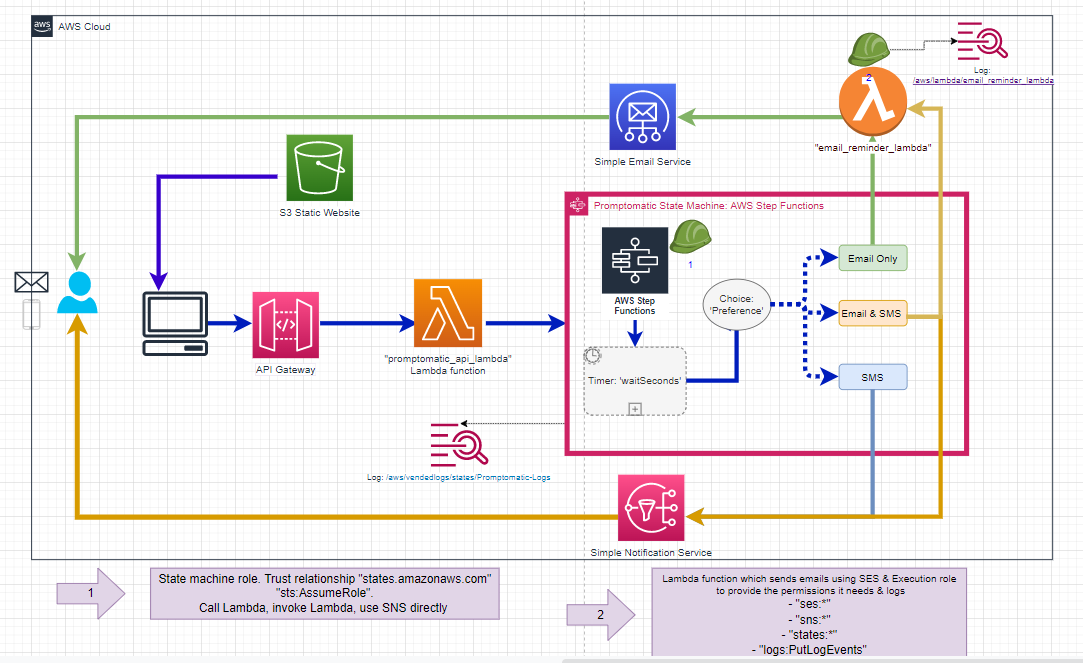
The state machine will control the flow through the serverless application. The state machine starts ... and then waits for a certain time period based on the Timer state.
This is controlled by the web front end you.
Then the ChoiceState is used, and this is a branching part of the state machine. Depending on the option picked in the UI, it either moves to:
EmailOnly : Which sends an email reminder
SMSOnly : Which sends only an SMS reminder
EmailandSMS : which is a parallel state which runs both
ParallelEmailandParallelSMSwhich does both.
Stage 4 - Create Lambda function proxy integration with APIGW

Creating a front-end API for the serverless app
The front-end loads from S3, runs in the browser and communicates with this API. Using APIGW for the API endpoint, using Lambda to provide the back-end compute.
Function - api_lambda > Python 3.8 > Default execution role > Lambda RoleAPI name - Promptomatic / Endpoint type > Regional. CORS > Enabled
Stage 5 - Configure State Machine Compute

Create an S3 bucket and static website hosting which will host the application front end.
Downloading the source files for the front end, configure them to connect to API gateway and then upload them to S3. Then running validation checks.
Loads HTML & JS From S3 & Static hosting
Communicates via javascript to API Gateway
uses api_lambda as backing resource
runs a statemachine passing in parameters
state machine sends email, SMS or both
state machine terminates
EXPLANATION:
-
So, my teacher is a Senior Champion Instructor at AWS (bolstered by 30 years+ experience in the industry. One one of the few people on earth who has actually written an Operating system. Plus affiliated with the cloud division behind F1 - so naturally, a big role model for me. Somebody I look up to, and wish to impress).
For the sakes of anonymity, I’ll refer to him as Buzz Lightyear.
As a personal rule of thumb, I never accept criticism from anybody who I wouldn’t ask for advice. Right off the bat, Buzz has been hitting home-runs in delivering knowledge and leading me forward. Naturally, his seniority comes at a cost and doesn’t have time to waste.
For whatever reason, the class of students which I’m in have never quite fossilised a friendship. I’ve extended myself and tried my part, but having never met each other in person, it’s not so natural to become friends just from speaking online. A large part of the learning journey comes from collaboration. The issue is that our dissonance makes it uncomfortable for us to collaborate and study together.
Naturally then, my ears perk up when Buzz spends time addressing this concern - that we’re not talking to one another - to the point where he’s had to intervene. This kind of passion is contagious, so much so that it has actually passed on to me.
So, to save Buzz the trouble of repeating these rallying mantras ad infinitum, I’ve built him a defter solution - introducing…..Prompt O’Matic!
-
I took the initiative to build PromptO’matic - http://promptomaticmarco.s3-website-us-east-1.amazonaws.com/. A serverless reminder application to save my instructor the trouble of repeating himself to uncollaborative ears a million times over.
It's a running website hosted on S3 connecting to a State Machine via Lambda & APIGW. A message is accepted from the gateway endpoint, digested by Lambda with associated rights and passed onto Step Functions to fulfil the request made.
The crux of the issue is that Venus (the name of my cohort) isn't collaborating enough as a team, so Promptomatic integrates with SNS for SMS & SES for Emails. With nowhere left to hide, the message will surely be heard.
-
So by connecting through to the gateway endpoint referenced within index.html, an event driven architecture will fan out calls to subscribers in my class. Getting it through to our thick skulls that idly jabbing at labs isn't enough, and we must instead work & practice with each other.
Worth mentioning that this won't work unless I validate the sending address for the Simple Email Service first. So far I've only whitelisted my 2 own email addresses, as well as a few other friends, but it does work when I've tried!
-
Long story short, cats are idolised in my class.
For better or worse, we’ve personified this knife-wielding cat as the antagonist to our security concerns on the cloud. Knifey McSlasher is there to nestle his way in, a constant reminder that we need to lock down and secure our applications on the cloud.